Journey From FaaS to Cronjob
by: theresa tech learningSome time ago, I was hired by a young professor of computer science as a research assistant. At this point in time, I was a Master’s student in psychology, specializing in human-technology interaction. I had taken an Introduction to Programming in Java class intended for first-semester information systems management students for fun and done better than most of them (not a big feat considering the 80% failure rate - many students discontinue their studies after the first or second semester because they realize the degree isn’t for them, and I should have done the same back in the days when I commenced my Bachelor’s in psychology, which definitely wasn’t for me). Due to these circumstances, the only feeble piece of qualification I had to offer my new employer was a basic understanding of programming in Java, and possibly some meta-skills (life experience! work experience!). Unfortunately, my qualifications regarding this job didn’t really expand all that much over the next few semesters as I still had to finish my master’s in an unrelated field, and after I was done with that one I had to invest some time in business classes in order to sneak my way into the information systems management Master’s (pending!!).
Long story short: I knew shit. So when my boss asked me to build a serverless function in AWS, gasp! I didn’t even know what a server was. I knew a few things about programming, but alas, I knew next to nothing about architecture. After an embarassingly long period of time, I managed to build the constellation shown in the image below 1.
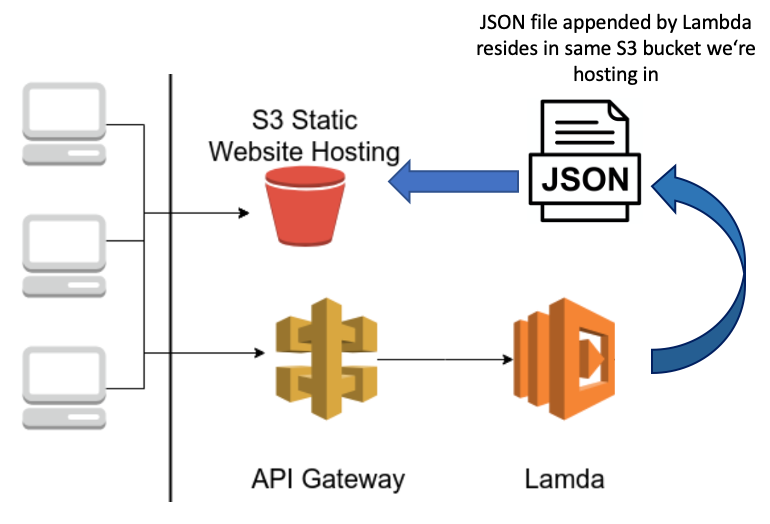
This is what it does:
- A static website is hosted on S3. It shows a few charts displaying data uploads to a server over time. The underlying data is stored in a JSON file residing in the same S3 bucket.
- The server can send new data to a Lambda Function via an API gateway. The Lambda appends the data to the JSON file contained in the S3 bucket, and thus the charts are updated.
Now we want to deliver the same functionality in a different way, avoiding AWS (ran out of credits - please fund German universities!). The new architecture to be built is shown below.
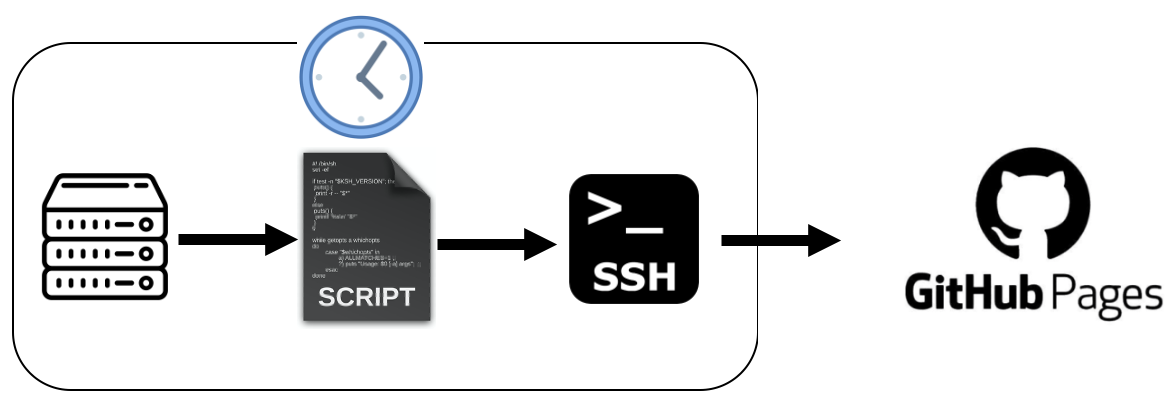
In words:
- A file containing the upload data is hosted on our server/VM.
- A bash script will be run regularly on the same machine (CronJob ⏰💦). Its purpose is to update a static website, now hosted on GitHubPages, using the upload data.
- In order for the bash script to automatically push to GitHub, an SSH key is required.
As with all tasks, it is helpful to break this one down into smaller bits and complete them step by step.
- Just like you would upon moving into a new apartment and deciding how to furnish it, it seems helpful to firstly log onto the VM and take a look around. The upload data has to be found and its format and structure examined (are any transformations necessary in order to be able to re-use the old static website code?). Also decide where we want to operate (although it doesn’t really matter).
- Set up an SSH key for the ssh-agent.
- Write the bash script and move it onto the VM.
- Add the CronJob that runs the bash script at regular intervals.
STEP ONE: logging onto the VM and checking out the data.
I had previously worked with AWS EC2 for running some compute-intensive scripts and was therefore not a remote shell virgin 🧚🏻♀️ However in the case of this VM, no key was required. Instead I just logged on with a username and password, using my Mac’s built in ssh client: ssh username@vm-address.de.
65 quadrillion ls- and cd-commands later, I arrived at the folder containing the relevant data. As there currently was no log of uploads per day, generating it appeared to be my first task. Here’s what I came up with (will explain everything step by step below):
#!/bin/bash

firstFile=`ls VM* -r --sort=time | head -n 1`
lastFile=`ls VM*  -r --sort=time | tail -n 1`
currDate=`date -r $firstFile "+%Y-%m-%d"`
endDate=`date -r $lastFile "+%Y-%m-%d"`

arr=();

while [ "$currDate" != $(date -I -d "$endDate + 1 day") ]; do
  n=$(date -I -d "$currDate + 1 day")
  count=$(find . -type f -newermt $currDate ! -newermt $n | wc -l)
  arr=("${arr[@]}" $currDate $count)
  currDate=$n
done
  vars=(${arr[@]})
  len=${#arr[@]}

printf "{\n" > data.json
for (( i=0; i<len; i+=2 ))
do
    printf "    \"${vars[i]}\": ${vars[i+1]}" >> data.json
    if [ $i -lt $((len-2)) ] ; then
        printf ",\n" >> data.json
    fi
done
printf "\n}" >> data.json
echo
And now the explanation, as this was my first bash crusade and I hence want to meticulously capture all my learnings.
The she-bang
It is good style to commence a bash script with a so-called She-bang: !#. Unsure if this is a misogynistic term some sys-admin incels living in their parents' basements came up with decades ago. I also didn’t know Ricky Martin had a song called She Bangs, which most likely constitutes some nerdy UNIX-hymn. The she-bang is used in scripts to indicate an interpreter for execution under UNIX / Linux operating systems 2. Here, we’re using #!/bin/bash to state that our script shall be executed by the Bash shell.
Defining and using variables
Up next, what I wanted to do in the first four actual commands of the script was to find the oldest and newest piece of uploaded data in the directory and extract their dates for the purpose of aggregating file uploads per day.
The ugly part was limiting this to the relevant files as these had no file extension! However, including !(*.*) (mdeaning ‘exclude files that have an extension of some kind’) in my statement broke it. Instead, I used a prefix exhibited by all of the relevant files in order to single them out.
firstFile=`ls VM* -r --sort=time | head -n 1`
This command lists (ls) all files in the directory whose name starts with VM (VM*), sorted in ascending order by the time they were last modified (-r --sort=time), grabbing the first one - i.e., the least recently modified file - (head -n 1) and assigns it to a variable named firstFile. The command below this one performs the same action for the most recently modified file.
currDate=`date -r $firstFile "+%Y-%m-%d"`
Now the least recently modified file’s modification date is extracted from firstFile in a YYY-MM-DD format (-r specifying that we’re interested in the last modification time of the file). Again, the same operation is performed for the most recent file. Note (to self) that whenever variables are addressed/utilized in a UNIX environment, they need to be prefixed with a $.
Aggregating uploads per day
After the dates on which the least and most recent uploads took place have been determined, an empty array is initialized (arr=();) and populated with data in a while loop (remember imperative programming? This is him now 🧑🏼🎤). To be precise the loop is doing its loop thang until the time of the most recent upload has been exceeded; and that thing is to check how many files were last modified on the date corresponding to the current value of $currDate, store the count (with the corresponding date) in the array and thereafter increment the value of $currDate by one day. Important bash statements utilized:
find . -type ffind in current folder (this location is specified by the.) all files (-type f) that fit the ensuing criterion …- … which in this case corrsponds to
-newermt $currDate ! -newermt $n: modified after$currDatebut before$n(the day after), i.e. exactly on$currDate. wc -l: count the number of lines, in this case of our query result.
Export the array contents to a JSON file.
The last part of the function, adapted from here, writes the array’s contents to a JSON file. Things to note:
>creates a new file and writes to it; if a file with this name already exists it is overwritten.>>by contrast appends to an existing file.printfunsurprisingly formats and prints its arguments. There are tons of options here.-ltis Bash’s<operator (less than). For>use-gt. A full list of Bash’s operators can be found here.$((len-2)): this one took me a while, so for future reference: this is how you use a variable’s value in a computation and then use the result.
A note
I then extended the script to count the uploads for different regions (directories) and also include data on user profile generation. The full code is here.
STEP TWO: writing another bash script that pushes data to GitHub.
a) The bash script.
The statsboard is now hosted on GitHub pages (just like our blog!). Hence, updating the data underlying the statsboard is accomplished via pushing to GitHub. Another (quite short) Bash script (see below) will therefore:
- clone the respective repository from GitHub (by cloning anew with every execution, any conflicts can be avoided)
- execute
count_uploads.sh - add the generated files containing ride- and profile upload data to the repository, commit & push
- delete the Git repository (by prefixing this command with
yes |, we automatically agree to any prompt molesting us with questions like “Do you really want to delete this file, even whilst bearing in mind that he, thine lord as died for thine sins?!?!?!!!")3
#!/bin/sh

cd /home/meerkat/SimRa

git clone git@github.com:simra-project/simra-project.github.io.git

cd simra-project.github.io

bash ../count-uploads.sh

mv ../rideData.json ./statsboard/rideData.json

mv ../profileData.json ./statsboard/profileData.json

git add ./statsboard/rideDdata.json

git add ./statsboard/profileDdata.json

CURRDATE=`date +"%d-%b-%Y"`

git commit -m "update data file $CURRDATE"

git push

cd ..

yes | rm -r simra-project.github.io
Before automating the execution of this script with a Cron Job, a few extra steps have to be completed.
b) The SSH jabberwocky (poppycock? - I looked up fun English words because I’m using shenanigans too often and hence don’t find it living up to my exteremely high humour standards anymore)
Open up a terminal and type the following command (replacing the e-mail address with the one your GitHub account is linked with):
ssh-keygen -t rsa -b 4096 -C "your_email@example.com"
This generates a new SSH key. When prompted to “Enter a file in which to save the key”, press enter to accept the default location. You will then be prompted to enter a secure passphrase; just hit enter again for no passphrase.
Add the key to the SSH agent with the following two commands:
eval "$(ssh-agent -s)"
ssh-add ~/.ssh/id_rsa
Then, print the public key using this command:
cat ~/.ssh/id_rsa.pub
Copy the public key to clipboard. Go to the GitHub repository. From the bar on the left, choose ‘Deploy Keys’. Click ‘add deploy key’. Paste the public key.
c) A little configuration
Firstly, tell the VM’s git installation who you are by specifying your user name and e-mail (using git user.name and git user.email). Obviously, the specified account needs to have the right to push to the repository in question.
Secondly, execute the script manually once; you will be prompted to add the GitHub remote to the list of known hosts (hint: accept!).
bash cronjob-client.sh
Importantly, use bash instead of sh to run it as some of the syntax is bash-specific.
d) Set up the Cron Job
Open the CronTab with a text editor (Vim, of course 🤠):
crontab -e
At the bottom of the file, add this (replacing YOUR-USERNAME with your username, of course):
20 10 * * * bash /home/YOUR-USERNAME/SimRa/cronjob-client.sh >> /home/YOUR-USERNAME/cronbuglog.txt 2>&1
This means: every day at 20 past 10 (check the VM’s time zone to determine a reasonable time for daily job execution) run the script cronjob-client.sh and print the output of any error messages to a cronbuglog.txt file in the specified location.