Let's JAM: Building a Blog with Hugo + GitHub Pages + Hover + Smol (Part 2)
by: tobias tech tutorial metaIn the last part of this series, we bought our domain name on Hover and installed hugo on our computer. This week, we’re looking at creating our repository on GitHub and setting up GitHub Pages.
I mentioned briefly how static web hosting (preferably over a CDN) is a core part of the JAMstack experience. There are a number of static web hosting solutions out there (apart from setting up your own with your own server, etc.), but we’ll be using GitHub Pages. GitHub Pages let’s you serve static content from GitHub repositories over the web and has a number of features that could be quite useful for us:
- it’s free 🎉
- it let’s you set a custom domain name and automatically generates a Let’s Encrypt SSL certificate for HTTPS
- it’s built right into GitHub so more than one person can collaborate on a blog without going the extra step of uploading generated files somewhere
- oh, did I mention it’s free?
Anyway, let’s first create a new GitHub repository for our blog at https://repo.new.1
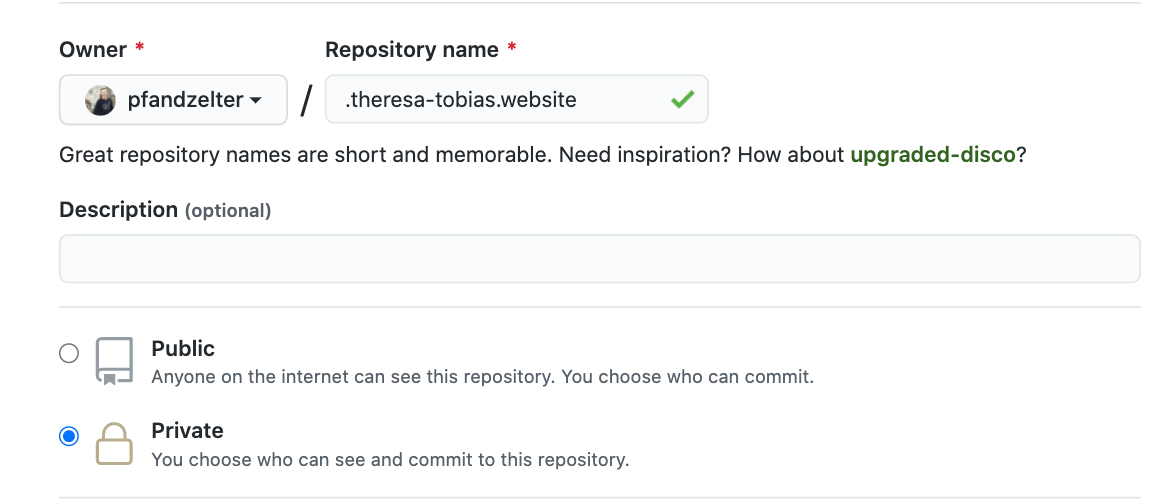
Back on our computer where we already had hugo create some basic files for us, go back into the project folder, initialize a git repository, and push our basic file and directory structure:
cd theresa-tobias.website
git init
git add -A
git commit -m "init"
git remote add origin https://github.com/pfandzelter/theresa-tobias.website.git
git push -u origin master
You will have seen that we already have a docs/ folder with some basic contents (but no blog posts yet), which we have now uploaded to GitHub.
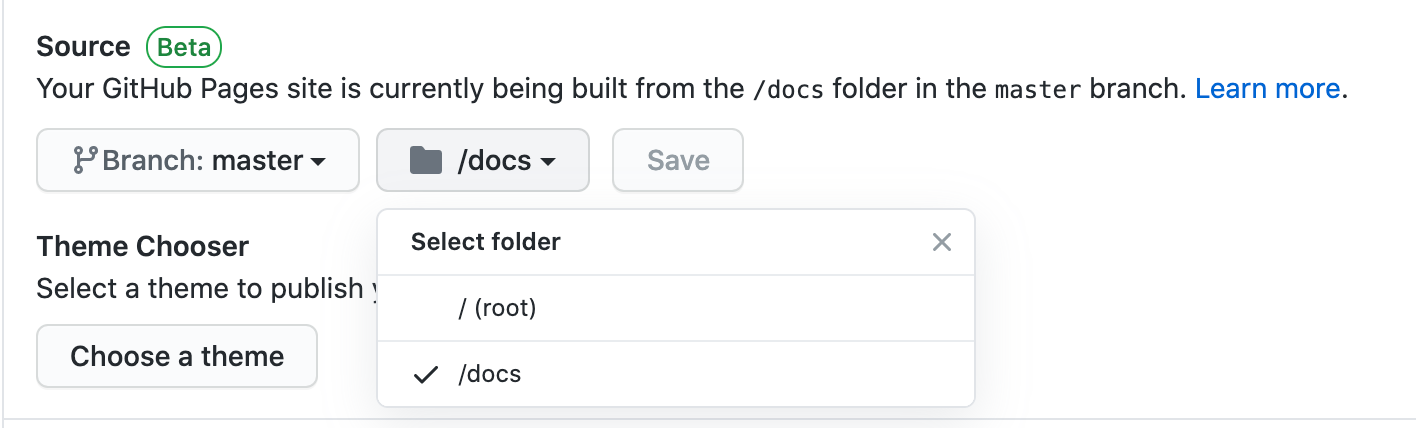
Let’s set up GitHub Pages!
Go to the Settings tab on the GitHub repository and scroll down to GitHub Pages.
Here, select the master branch and our docs/ folder as a source.
Now, we’re live!
Well, kind of.
So far, we can reach our page at http://pfandzelter.github.io/theresa-tobias.website (or whatever your username is).2
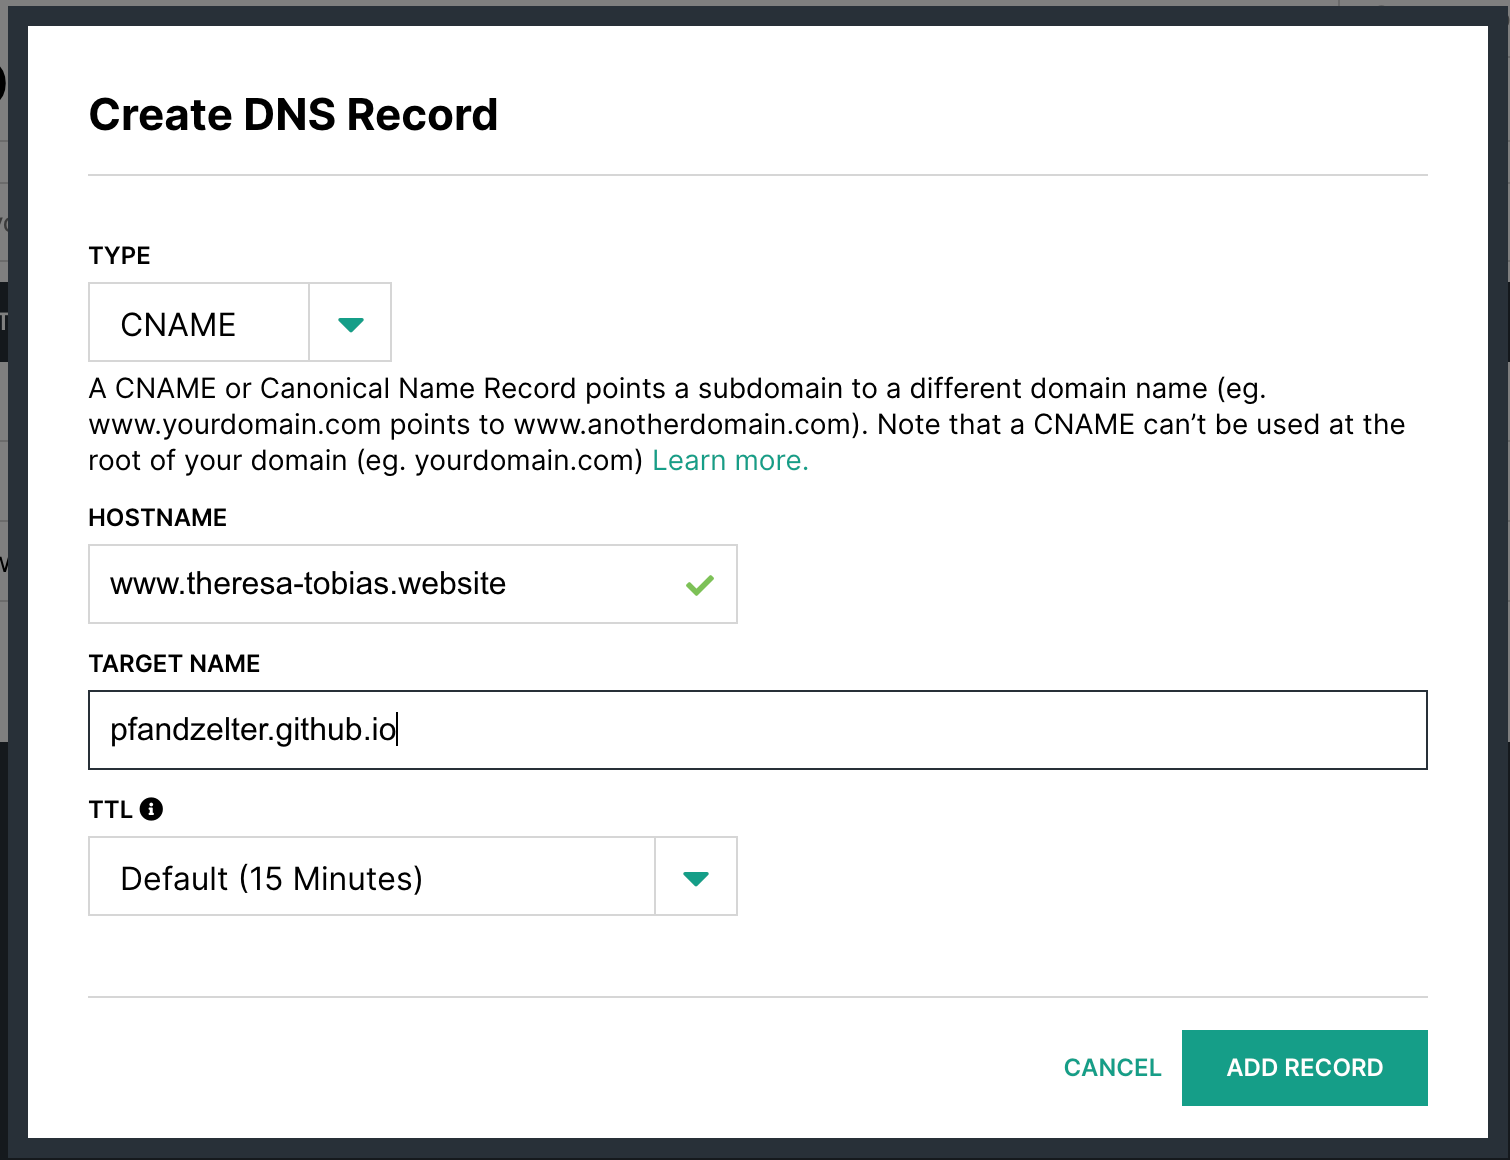
To set up our custom domain name, let’s go back to Hover and set up the correct DNS records. In the Control Panel for our domain, go to the DNS settings and set the following new record:3
As an optional step, we set up a forward from theresa-tobias.website to www.theresa-tobias.website in the Forwards tab of the Hover Control Panel.4
Finally, let’s go back to the GitHub Pages settings on our repository and enter www.theresa-tobias.website as our custom domain.5
Now, you might be asking yourself: why does GitHub Pages actually care about the domain we`re using if we set our DNS records on Hover?
Thank you, that’s a smart question to ask.
GitHub Pages needs to know what hostname we’d like to use to set up HTTPS for us.
HTTPS is HTTP over TLS, and TLS is short for Transport Layer Security - essentially, it’s just more secure HTTP and, despite our blog not really needing any security because it’s all public anyway, it’s a good thing to have.
The SSL certificates you need to enable TLS from a server-side used to be super expensive because a company would vet you first before issuing your certificate - but thank’s to the Let’s Encrypt project, it’s free now!
We won’t get into how the Automatic Certificate Management Environment (ACME) works here, as GitHub Pages requests the needed certificates automatically, but it’s useful to know that it requires that we have already set up the correct DNS records.
HTTPS will be enabled automatically by GitHub Pages but it takes up to 24h for it to request the certificate. After that, it’s a good idea to enable Enforce HTTPS, which will redirect your clients from HTTP to HTTPS.
And, well, that’s it. In a few easy steps we have set up our GitHub repository and are now already hosting a blog (albeit an empty one) at our very own domain, all encrypted with HTTPS. In the next part of this series, we’ll be writing and publishing our very first blog post!
-
the .new TLD is a project by Google that let’s companies buy cool .new domains (for $500 each) to let their customers create new content: besides repo.new (GitHub repositories), there are also gist.new (GitHub Gists), docs.new (Google Docs), slides.new (Google Slides), playlist.new (Spotify), and a lot more (I guess) ↩︎
-
be aware that DNS caching may prevent you from reaching your site immediately for anywhere from 15 to 60 minutes ↩︎
-
DNS is short for Domain Name System. It serves as the translation system from domain names to IP addresses. If you buy a domain name, you get to set your own records into your DNS servers (or, I guess, the ones hosted by your DNS provider). We’re setting a CNAME (canonical name) record here that tells people wanting to access
www.theresa-tobias.websiteto please lookup the IP address ofpfandzelter.github.io, because we don’t know GitHub Pages' IP addresses. We could also set up an A (IPv4) or AAAA (IPv6) record for this domain and enter an IP address directly. ↩︎ -
Most browser will do this automatically, but it can’t hurt - actually the
wwwpart of the domain isn’t even shown in Chrome’s address bar. You can also host your blog directly ontheresa-tobias.website(withoutwww) but it’s super hard to set up because it technically isn’t allowed per the DNS standard. Oh, also the redirect we’re setting up only works forhttp://, nothttps://(just something to keep in mind). ↩︎ -
This will make GitHub automatically add a file named
CNAMEinto thedocs/folder your repository - be careful messing with the autogenerated content here! ↩︎